In 2026, choosing a street light mounting bracket is more than a matter of appearance. The bracket must suit the pole, luminaire, and local site conditions. A mismatch can cause difficult installation, poor positioning, or premature wear. Small details matter. Check the pole’s diameter, the fixture’s mounting interface, and the required outreach before comparing styles. A longer arm may improve light placement, but it also changes the load on the pole. Wind exposure, vibration, and the combined weight of the fixture and any attached equipment deserve attention.
How to select the right mounting bracket for a street lamp? Start with the project requirements and the manufacturer’s published specifications. Confirm material, finish, dimensions, load ratings, and compatibility with the pole and luminaire. Galvanized steel and aluminum are common choices, but neither is automatically right for every environment. Coastal air, road salt, and frequent maintenance can influence material and finish decisions. Newer luminaires and smart control devices may also add weight or affect access. Ask for product drawings and installation guidance when details are unclear. A bracket can look suitable on a product page and still fail a basic fit check. That is easy to overlook. Real sites rarely match tidy diagrams perfectly, so measure the pole and verify connections before ordering. For unusual heights, exposed locations, or uncertain loads, have a qualified lighting or structural professional review the selection. This practical check can prevent avoidable rework and help keep the finished installation stable and serviceable.
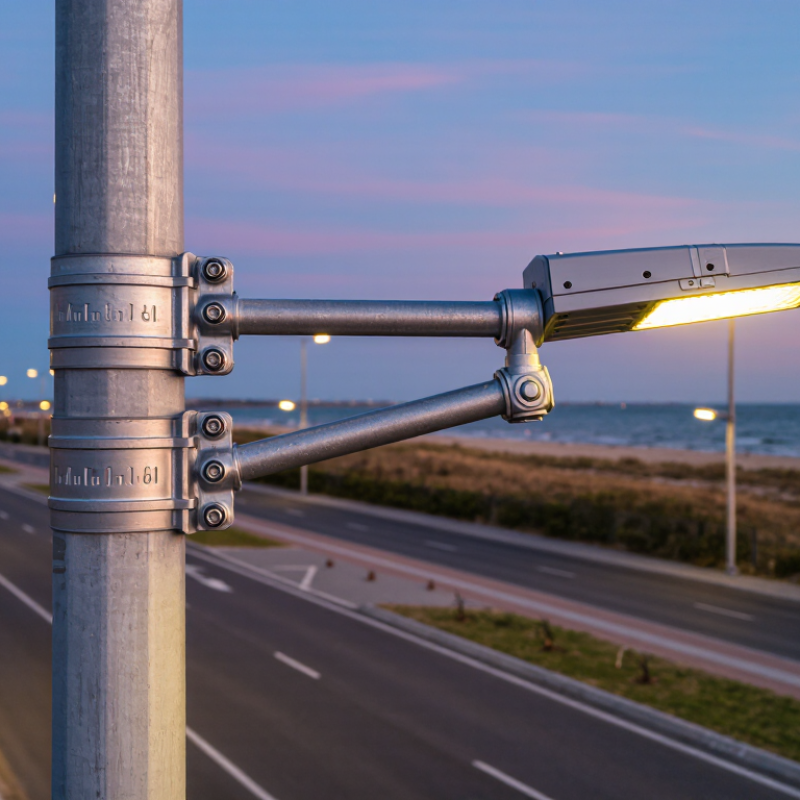
Define Pole Fit, Arm Reach, and Luminaire Interface Before Selecting a Bracket
A street light mounting bracket should fit the pole before it suits the fixture. Measure the pole’s outside diameter at the installation point, since tapered poles can vary from top to bottom. Check whether the bracket uses a clamp, a slip-fit tenon, or another connection. Small gaps matter. A clamp that looks close may still shift under vibration. Confirm the specified diameter range and pole shape against the actual pole, not an old drawing.
Arm reach affects where light lands and how much leverage the bracket places on the pole. Measure from the pole centerline to the luminaire mounting point, then compare that distance with the lighting layout. A longer arm may clear a sidewalk tree, but it also increases bending force. Wind exposure and fixture weight belong in the selection, too. This part is easy to underestimate.
Finally, match the bracket’s luminaire interface: tenon diameter, insertion depth, bolt pattern, and adjustment range. Check that the fixture can be leveled without forcing the connection. Use the manufacturer’s load and fit specifications, and verify dimensions on site before ordering. A tape measure is useful, but it cannot reveal every hidden mismatch. I would recheck critical measurements with a second person, especially when the pole is tapered or the existing hardware is worn.
Estimate Wind Demand Using ASCE 7: qz = 0.00256KzKztKdV² (US units)
How to Choose a Street Light Mounting Bracket in 2026
Estimate wind demand with the ASCE 7 velocity-pressure equation:
qz = 0.00256KzKztKdV².
In US customary units, qz is in pounds per square foot, and V is in miles per hour. Kz accounts for exposure and height; Kzt adjusts for topographic effects; Kd reflects wind directionality. Use the wind speed and ASCE 7 edition required for the project location, not a nearby weather station’s average. Small details matter.
Treat qz as a starting pressure, not the final force on a bracket. Apply the relevant force coefficient and exposed area, including the luminaire, arm, and any other wind-catching surfaces. Then check bracket bending, fasteners, and the pole connection for the resulting forces and moments. A compact fixture can still create substantial leverage when mounted on a long arm. These estimates are useful, but site conditions and installation details can make the neat equation feel less certain.
Tips: Confirm the mounting height, exposure category, and terrain before selecting a bracket. Compare calculations with the manufacturer’s allowable loads and project requirements. If the inputs are uncertain, document the assumptions and have a qualified structural professional review them.
Check Bracket Capacity Against Luminaire Weight, EPA, and AASHTO Design Loads
A street light bracket must support more than the luminaire’s listed weight. Record the fixture weight, mounting height, arm length, and any accessories, such as shields or cameras. Then check the luminaire’s EPA, or effective projected area, which indicates how much wind-catching surface it presents. A broad, lightweight fixture can create significant wind force.
Compare the bracket’s rated capacity with the combined demands required by the project’s AASHTO design criteria. Wind pressure acts through the fixture’s EPA, while arm outreach increases the bending moment at the pole connection. Check the specified load combinations, including any required ice or vibration effects. Small details matter. Confirm that the rating applies to the bracket orientation and connection hardware you will use, not just the bracket alone. A larger capacity number is not automatically a safe match; pole strength and fastener condition matter too. When drawings omit EPA or load assumptions, pause and get them clarified. Guessing here is easy, and it can leave a weak point hidden above the street. Have a qualified structural professional verify the final selection for the site.
Specify ASTM A123 Hot-Dip Galvanizing: 100 μm for Steel Over 6 mm Thick
When choosing a street light mounting bracket, check the steel thickness and galvanizing requirement together. For steel sections over 6 mm thick, specify hot-dip galvanizing to ASTM A123/A123M, with a 100 μm coating requirement where the applicable product category calls for it. Confirm the current standard’s table and the contract specification before ordering; thickness categories matter.
Ask the fabricator to identify the coating requirement on the purchase documents. After galvanizing, a calibrated magnetic gauge can check coating thickness at several points, including near edges and welds. One reading is not enough. Surface preparation, steel chemistry, and the shape of the bracket can affect the result. A heavy coating may also collect around corners or obscure small drainage details. It looks durable, but appearance alone proves little.
Check that the bracket design allows molten zinc to drain and air to escape during processing. Sealed cavities can create hazards and coating defects, so review vent and drain openings with the galvanizer before fabrication. I would also verify that cut edges and weld areas receive suitable coverage. This step is easy to overlook. Document the inspection method and acceptance criteria, since “100 μm” can be misread as a guaranteed reading at every point rather than a standard-based requirement.
How to Choose a Street Light Mounting Bracket in 2026 - Specify ASTM A123 Hot-Dip Galvanizing: 100 μm for Steel Over 6 mm Thick
| Selection factor |
Practical specification or example |
What to verify |
| Bracket configuration |
Straight arm, single-arm, or wall-mounted bracket; select the configuration to suit the pole or supporting structure. |
Confirm mounting orientation, clearance, luminaire fit, and access for installation and maintenance. |
| Outreach and arm angle |
An illustrative outreach range is 0.5–2.0 m; arm angle and length should be chosen for the required light position. |
Check the lighting layout, roadway geometry, luminaire orientation, and structural loads. The example range is not a design limit. |
| Pole connection |
For a slip-fitter connection, specify the measured pole tenon outside diameter and the bracket’s compatible fitting size. |
Verify dimensions, insertion depth, fastener arrangement, and manufacturer-neutral interface drawings before ordering. |
| Steel plate thickness |
An illustrative fabricated bracket may use plates around 6.1–10 mm thick, depending on its geometry and design loads. |
Have the bracket checked for the project’s wind, dead, fatigue, and connection loads; this example is not a structural design specification. |
| Hot-dip galvanizing |
Specify hot-dip galvanizing to ASTM A123/A123M. For structural steel over 6 mm thick, the specified minimum average coating thickness is 100 μm, subject to the applicable product category and standard requirements. |
State the steel product category and thickness on the purchase specification, and request coating inspection documentation. Do not treat 100 μm as a universal requirement for every product category. |
| Fabrication before galvanizing |
Complete cutting, drilling, and welding before hot-dip galvanizing wherever practicable. |
Provide suitable vent and drain openings in hollow or enclosed sections and coordinate their locations with the fabricator and galvanizer. |
| Fasteners and interfaces |
Specify compatible corrosion-resistant fasteners and mating components for the exposure environment. |
Confirm fastener coating requirements separately; ASTM A123/A123M is not the specification for every type of fastener. |
| Final project checks |
Match the bracket to the luminaire, pole, site exposure, and installation method. |
Obtain approval of the drawings and structural calculations for the specific project before fabrication. |
Example dimensions are indicative selection references, not code requirements. Confirm the current applicable standard edition and project-specific engineering requirements.
Verify Grounding, Fasteners, and Installation Against Applicable Electrical Codes
In 2026, choose a street-light bracket as part of a listed assembly, not as isolated steelwork. Confirm the pole, arm, luminaire, and wiring method match the installation instructions and locally adopted electrical code. NEC Section 110.3(B) covers installation according to equipment instructions; Article 250 addresses grounding and bonding. Small parts matter. A painted joint or loose bonding jumper can interrupt continuity, so verify the specified bonding path with an appropriate meter after installation. Do not assume metal-to-metal contact is enough.
Check fastener grade, diameter, corrosion compatibility, embedment, and required torque against the bracket documentation and pole design. Do not guess. For roadway supports, follow the authority’s adopted structural criteria, including wind exposure; electrical approval alone does not establish mechanical capacity. NFPA’s Home Electrical Fires analysis for 2015–2019 estimated an annual average of 32,620 U.S. home fires involving electrical distribution or lighting equipment, with 430 deaths and $1.3 billion in direct property damage. These are not bracket-failure statistics, but they underline the need for careful electrical installation. Before energizing, inspect for damaged threads, missing washers, water entry, and cable insulation pinched at the arm. I still double-check torque records; field notes are easy to overlook.
Conclusion
Choosing a street light mounting bracket begins with confirming that it fits the pole, provides the required arm reach, and matches the luminaire’s connection interface. How to select the right mounting bracket for a street lamp? Start by documenting these dimensions and the fixture’s weight and effective projected area (EPA). Then estimate wind demand using the applicable design inputs and the ASCE 7 equation qz = 0.00256KzKztKdV² in US customary units. These estimates help determine whether the bracket can support the luminaire under expected wind conditions.
Compare the bracket’s capacity with the fixture loads and applicable AASHTO design requirements, rather than relying on appearance or weight alone. Specify hot-dip galvanizing to ASTM A123, including the relevant coating requirement for steel over 6 mm thick, and confirm the finish suits the installation environment. Before installation, verify grounding, fasteners, and assembly details against the applicable electrical codes and project specifications. Together, these checks support a well-fitted, durable mounting system.

 Penelope Light